Developing My Range Of Stoneware Tableware - Sheffield Pottery
Share
Coffee Cups & Saucer Sets – How I make Stoneware Tableware
This is an update about some new additions to my handmade tableware range. I’ve had a fun few weeks making coffee cups and other new pottery.

I’ve had a commission to make a set of coffee cups and saucers. I’ve enjoyed making them – it’s always nice to try new stuff. My commission was for a set of six but I decided to do some extras in slightly different styles. The cups were fairly straightforward, basically just a small mug. I had to scrunch up my hand smaller than usual to get a handle in proportion.
I’m fairly new to stoneware tableware, I hadn’t made any saucers before this project, although I have made some small plates before. For me there were some important design considerations for the saucers. They should be light enough to be picked up with the full cup with ease. The size and shape should compliment the cup, and they should stack nicely together. Some time was taken to throw the first saucer to my preferred shape. I set a gauge at the rim and threw the other saucers to this. Once dried a little I trimmed the underside to reduce weight. The foot and inside where the cup sits were trimmed precisely to ensure good stacking.
I’ve written an article about glazing these cups and saucers here.

Other Stoneware Tableware – Perfecting my Jugs!
Also this month there’s been a fair bit of jug making. This was sparked by another commission for a large bellied jug that is unglazed on the outside. The customer wanted some writing on it and I decided to buy a set of small stamps to do this. My thinking was it would be neater than trying to carve lots of letters. I think it looks pretty good, although quite time consuming finding all the letters.

I’ve always had problems making jugs in the past that have been quite bottom heavy. It’s quite tricky getting sufficient clay pulled up out if the base, whilst maintaining wall strength so it doesn’t collapse. Hopefully I’ve addressed the problem this time, I have started doing knuckle pulls and am using the stiffest clay I can manage.
I have also explored different ways of pulling the spout for my jugs. My preferred method is to use a sponge to pulled the spout upwards, while holding back the rim with the finger and thumb of my other hand. This lifts the clay slightly, and starting the pull from a couple of inches below the rim gives a nice throat to the spout. I’ve found its important to dip the sponge in some wet slip before doing this to avoid exposing lots of grog on the clays surface.
Finally, I’ve had fun making little wooden stamps by cutting the ends of dowel with a saw and drill. These designs are inspired by medieval type sprigs which I have seen on old pottery. Sprigs are usually pressed into plaster moulds, then popped out and attached to the body. For my jugs I rolled little clay balls, stuck them to the pot, then impressed the stamp. I like the way the stamps look when raised up away from the body of the jug.

Selling Tableware Sets on my own website – Pottery goals for 2017
Recently I’ve been very busy making pots and working on new ways of selling pottery. I’ve been excited to start making my first tableware sets. I have also written a little article on how I use a gauge and repeat throwing to standardise my handmade tableware.

Recap of 2016
Last year has been my most successful so far regarding pottery. My Etsy sales have continued to grow, and I’ve had quite a few commissions through my own site. This has given me the opportunity to meet some customers face to face and get feedback which has been really nice.
Pottery Goals for 2017
I’m going to set quite ambitious goals, the arrival of our new baby next month may affect them of course!
Etsy has been a great way to start selling my pottery but I am going to try something new this year. As the business grows I feel I need more control over the sales side. I wouldn’t want to rely on a 3rd party if I was doing this full time. If there was any major problems with Etsy I could be left without any outlet for my work.
Selling tableware sets directly with Magento
I’ve decided to start selling pottery directly from my own website. I’m currently setting up a Magento e-commerce system, but I will continue to blog about pottery on the same site.
For the launch of the new site I am working hard to produce a whole range of stoneware tableware sets, drinkware and kitchenware. Up until now I have mostly produced only single or pairs of pots. While I’ve been discovering the style I like, it’s made sense to do one-offs.
The pottery I have made most recently with carved decoration and layered glazes has been the first I’m truly proud of. This has given me the confidence to make multiple items in the same style. Initially I’m making most tableware items in multiples of four or eight. Customers will be able to order sets of however many items they like – depending on stock levels.

I have tried out some new production methods for the drinkware range. Some of the cups have exaggerated throwing lines – these should show off some nice highlights with layered glazes applied. I’ve also attached and pulled the handles in a new way for me. For the smaller cups the handle is attached directly level with the rim and tapers away from the body.

Along with a new range of pottery I am going to update the logo and branding of Woodseats Pottery. It’s been a few years since I made the current logo. The new look will aim to be more elegant and professional looking. The logo needs to work at low resolution for mobile devices, the current one is a bit busy for small screens.
Custom made pottery sets
I’ve produced some other custom made pottery recently for a friend of mine. She wanted a set of coffee cups and saucers made to specific dimensions, and shapes. I was happy to oblige and think the set turned out pretty nicely. I also made a small sugar pot and milk jug to accompany the set. This is a combination of two glazes which I initially had problems applying to the pots.
I also had some problems with pinholing /crattering of the glaze once fired on some test pieces. After some head scratching and reading it seemed the bisque temperature was the problem. I refired to a higher bisque temperature and the set has turned out great.
The recipient was very happy when I delivered the pots, and I had lots of fun making them.
These Custom Made Pottery Jugs make a Great Gift Idea
I’ve recently had requests to make custom made pottery for gifts. One of these gifts was a commemorative jug for a wedding anniversary present. The jug has two sides with a stamped letter decoration. The first side has the anniversary date and names of the couple. The reverse side has the celebratory message “happy ruby anniversary”. The jug will be a great reminder of a long happy marriage.

As with all my pottery the jugs are happy to go in a dishwasher or microwave. They hold around one litre of liquid.

The other commemorative pottery I’ve made recently was a jug for a dads birthday. This has the family house name stamped on it. For this pot the outside is unglazed, while the inside has a clear glaze. This gives it a rustic appearance.

I could stamp letter decoration into other pottery, perhaps platters or vases. If you are interested in getting a special anniversary or birthday gift contact me. Make sure you leave plenty of time though as it will probably take a few months depending on workload.
Slipware Jug and Tumbler set in Stoneware


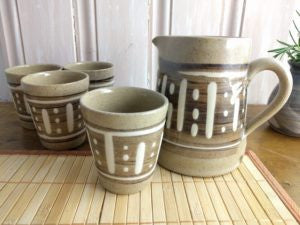
This set of tumblers and slipware jug are my first set available to purchase on Etsy. The shapes are intended to reference each other – a tumbler upside down is the same overall form as the jug.
They were decorated with slip. Firstly a black iron oxide slip was brushed on as a background, then the white slip trailed on over the top. I have tried to keep the decoration style quite loose.
I have struggled previously to make jugs that are as light as I would like. When the neck of a form is constricted it makes it more difficult to pull the clay up I find. The conical shapes I’ve used here have been more successful in creating a light pitcher. The one pictured is the last in a series I made, and turned out the largest of them all with the same sized lump of clay.
The cups are intended to be used as water tumblers, but they are also a good size for wine!
Update: I’ve just sold this set a couple of days after uploading to Etsy. I will probably be making a couple more sets in different designs. If you’re interested in buying a custom made slipware jug set me know.
My Handmade Stoneware Vase Designs are looking Good!

I’ve been busy trying to get a full kiln load to fire again before Christmas.
How I make my stoneware vases
These small stoneware vases are an experiment with new slip recipes, and decoration techniques. The two on the left have been painted with a slip that is 50% my stoneware body, and 50% china clay. The slip on these two has been brushed on using a large brush that I normally use for painting skirting boards etc.
I have found that painting the pots on the wheel straight after they have been thrown means the slip goes on very nicely. Previous attempts at painting slip on bone dry pots has been frustrating, as the brushes catch, and don’t allow a nice flow of slip. This resulted in awkward looking brush strokes. By painting on these freshly thrown pots I think the wavy designs look quite natural and flowing.
The middle vase is around 10% Black iron oxide, with stoneware body. I have done some sgraffito on this one whilst still on the wheel to reveal lines of the original clay underneath.
The other two use red iron oxide, cobalt and copper carbonate as colourants, and have been done in a kind of neat concentric band design.
The vases haven’t been fired yet, so the colours will be very different after that. I have left some clay visible with no slip on most of them, I’m quite interested to see how my new clay bodies look naked!
My vases out of the kiln!
Pictures of the fired stoneware vases below. The cobalt blue slip, white slip, and copper green came out pretty much as I expected. The iron oxides turned a kind of blue grey which I certainly didn’t expect. I tried a slow cool on this firing which will have had something to do with the colour – although it wasn’t very slow, only around an hour @ approx 1000 degrees.


1 comment
Thank you for the details and processes explained in your website, Love your work…..