Pottery for beginners – Equipment & Tools needed to get started
Share
Pottery for beginners can be intimidating, there are so many technical terms and strange looking tools. I was introduced to the craft through my wife, so I got a bit of a head start. Hopefully this page will help someone who is getting started with pottery. You can follow this link to see some of my finished handmade mugs.

Before going out and buying anything, see if there are any evening classes or courses in your area. If you get the bug for mud, then you can start thinking about getting your own setup.
For those of you in the Sheffield area, here are a few links to places running courses or evening classes.
What clay to use when starting in pottery
Before considering what equipment to buy it’s worth thinking about what clay to use. The different firing temperatures of each clay type may determine what sort of kiln you need.
Broadly speaking clay can be classified as earthenware, stoneware or porcelain.
Earthenware is the lowest firing clay, this means it matures in the kiln at a low temperature. This has the advantage of requiring less energy, therefore cheaper electricity bills. Earthenware is more porous than other types of clay. This makes it unsuitable for use in dishwashers and microwaves. Water absorbed in the clay can cause cracks during heating. However, glazed earthenware is perfectly safe for food use but it will need to be hand washed.
Stoneware is a middle temperature range clay. There are many types which vary in the exact temperature they mature at. It is available in colours from almost white to buff (tan), red or speckled. Stoneware fired to maturity is usually suitable for use in dishwashers and microwaves. This makes it an ideal clay to make tableware with – everyone loves mugs!
Porcelain is the highest firing clay. If you intend to use it make sure your kiln is capable of reaching the required temperature. Many of the smaller hobby style kilns won’t go that high. Porcelain is a beautiful fine ceramic which can be translucent when thin due to its purity. It is also very expensive, around twice the cost of other clay.
Methods of producing pottery for beginners
There are many different methods of producing ceramics. Some people make beautiful professional pottery from rolled out slabs of clay. Slabs can be formed into cylinders or slumped over molds to form plates or bowls. Slabs of clay can be rolled by hand, or if many are required a slab roller machine can be used.
Pottery can be cast in molds using a runny wet mix of clay called slip. Molds can be bought from ceramic supply stores, or made from plaster if a special design is required.
A pottery wheel can also be used to throw clay into many shapes. It does take time to learn the throwing skill, but once mastered it’s a very efficient method. Pottery wheels can be electric or powered by the potter kicking their leg.
Pottery for beginners equipment list
The main piece of equipment necessary is a kiln. If you are only interested in ornaments or models you could use polymer clay or air drying stuff. If you are interested in making any tableware, vases or other robust pottery a kiln is vital. Some potters use wood or gas to fire kilns. For this article I’ll concentrate on electric kilns as they are more suitable for pottery for beginners. Most small electric kilns fire to a max temp of around 1280°C.
Buying a kiln for the first time

The smallest kilns will be more mobile and can plug into a standard mains socket. Larger kilns may need to be wired into the mains by an electrician. Smaller kilns mean firings can be done more often. It doesn’t take as long to make enough pieces to fill the kiln to fire it efficiently.
I bought my kiln on eBay. At the time I was new to pottery and didn’t really know what to look for. I think I paid about £150 for an old kiln sitter type. I was lucky to end up with a kiln in quite good condition. Its internals are around 14″ diameter and 24″ heigh. Sometimes I wish it was smaller so I could fire more often.
The most important things to look for in a used kiln is the condition of the firebricks, and the elements. Usually there will be some ware and tear with a used kiln. However, major cracks in the lid or base, or elements hanging out of the bricks should raise alarm bells. Kilns wear out over time, each firing degrades the elements which will eventually need replacing.
Buying a new kiln is much like a new car, you get something shiney and fresh that you know hasn’t been abused. Spending thousands wasn’t really an option for me, and my kiln is still working well after four years occasional use.
Due to the extremely high temperatures, kilns need to be located in a garage or external building. Care should be taken to remove flammable materials from the area.
Choosing a potters wheel for beginners

Assuming you are interested in the throwing method of production, you will need a wheel. If space is limited an electric wheel would be more suitable. For a beginner potter even the smallest electric wheel would be sufficient. It’s only when making really big pots that a high powered wheel is needed for more torque. For me I think variable speed control is important. Some wheels only have a gear system with a number of speed increments. The ability to reverse the wheel direction is important if you’re someone who find it easier to throw the ‘wrong way’.
People using kick wheels say they feel more in control than using electric wheels. This may be true, I haven’t used one myself. I hope to try a kick wheel one day, perhaps when I have space to buy one.
What potters tools are needed for beginners?
Not many too are needed when starting out. It’s easy to get carried away when looking at a ceramics supply brochure or pottery website. The most important tools are your hands, and these should be looked after! The hands are actually great at producing natural curves on pots. I make dinner plates by crimping my index finger and thumb at the rim. This profile would take ages to perfect using tools.
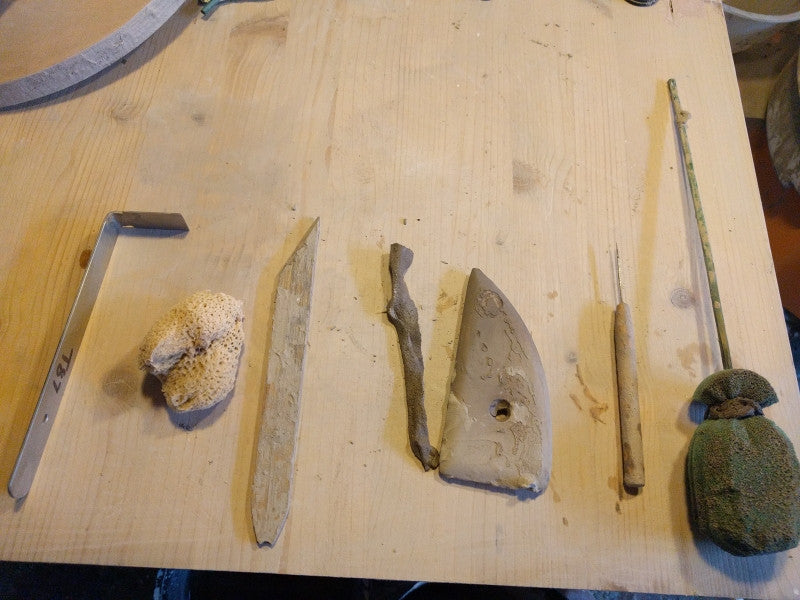
Having said that there are a handful of tools I use regularly.

Top seven tools for pottery throwing!
- I mainly throw pots on the wheel, for this a cut off wire is needed to remove the pot after it is complete. The wire is usually nylon or metal with wooden toggles at each end to grab hold of.
- A sponge is used to wet the pot with water while throwing to provide lubrication. A sponge on a stick is handy for removing water from inside narrow necked forms.
- My favorite thing to smooth the rim or pots is a small piece of chamois leather. You can buy big chamois from car cleaning sites and cut them down.
- When making plates or shallow bowls a wooden rib is useful for smoothing the base.
- Pin tools are great for cutting the top from wobbly pots, or popping air bubbles. Thin pin tools are better than the fatter ones.
- A throwing stick can clean up the outside of pots, and make an undercut bevel at the base. A bevel makes cutting the pot from the wheel easier.
- A trimming tool is needed if making pots with footrings. This tool is used to refine the shape when the clay has firmed up.
Glaze choices for pottery beginners

Some pottery such as flowerpots may be made without being glazed. Most other pottery items are glazed. Glaze can be gloss or matte finish, with many levels between. Generally a gloss glaze is favoured for tableware due to its easily cleaned surface. Some glazes may be coloured but still show some of the clay body beneath. This may be good if using a speckled clay which you’d like to be seen.
The easiest way to make a glaze is to buy a ready made powder from a ceramics supplier. There are many options for colours when buying ready made glazes. Importantly the firing temperature must match that of your clay, and be within the limits of your kiln.
When trying out a new glaze 2kg of powder would be sufficient to enable dipping of mugs or other small items. As a starting point 1kg of water should be added per 1kg of powder. When working with any powdered glaze materials you should definitely wear a respirator mask. A fine sieve should be used to pass the mixed glaze and remove any large particles. Sieves are an essential for a good glaze finish, try and get an 80 mesh as a minimum. They are available from pottery supply places.
I make my own glazes these days but as a beginner I bought powered glazes ready made. They are designed to produce consistent results with many different clays and firing methods. With so many other things to learn when starting in pottery, glaze chemistry could be a bridge too far.
I make glazes because I enjoy the experimentation, I have more control over colour and texture, and it’s cheaper. Some professional potters use ready made glazes and have great results.
Pottery suppliers
This is a small list of companies I have bought from and have been pleased with their service. I’m sure there are many other great suppliers around the country.
http://www.ctmpotterssupplies.co.uk
Related pottery guides
If you are ready to start selling your pottery online I have just written a big guide for you. If you're struggling with Instagram, my follower growth PDF can be downloaded by signing up to my mailing list below.
My article on how to use a pottery wheel to make plates may be useful if your are interested in making plates.
Perhaps you are advanced enough to start making your own pottery glazes.

11 comments
Thank you so much this will go a long way but I stay in Nigeria where can I get those materials
Thanks for such a simple guide to getting started! Can’t wait to give it a go!
Hi I am just starting to make gnomes, small houses, bowls with air dry clay but would like to move on to using proper clay to make bowls,dishes and plates
What should I get first? And what type of clay would be the best. , thank you Johanna
I’m using Valentines Stoneware Special Fleck at the moment
What clay do you use?